Sunday, July 5, 2015
2013 Audi A3 Review User Manual Owners Pdf Download
 |
| Google Images |
 |
| Google Images |

Sunday, August 25, 2013
Audi A4 A4 Rear Amp Replacement
1999 Audi A4 1.8T w/Concert headunit
The real reason for this article is to help people out with the wiring diagram for the harness in the 1999 Audi A4s. That is the primary piece of info that would have helped me out online. Otherwise, the info here is pretty standard and this is NOT a super hi-fi set-up experience. This is a "I want the harness wiring diagrams to fix/replace my rear amp" experience. Hopefully this article makes you feel more comfortable about attempting this.
I purchased a pre-owned A4 sigh-unseen for a great price that came delivered with a missing rear-amp (and turbo clamp and ac belt, I quickly discovered! :) ). Although the dealer offered to get me one as soon as another A4 came through his lot, I opted to just install a third party amp rather than wait (after waiting 4 weeks first) and to avoid the fact that if the dealer pulled it from another A4, then someone else would have to deal with it. That just didnt seem right to me. And since the dealer was apparently dumping this otherwise good Audi for such a good price for the reasons explained above, I couldnt complain about this very simple and inexpensive fixes. However, the rear-amp fix, if I used an Audi part (8d5035401), which came as both speaker and amp only, would cost about $200 with no dealer mark-up. Since it was such a dinky amp (the base Concert speaker set-up), I figured a 200w 2-channel amp from anywhere would actually be better. I got one for $50 from Walmart, no less, to fit the bill.
The rear amp is a smallish thing, normally attached to the rear left speaker (sedan) in the rear deck plate. It appeared to me the amp had somehow been broken off the speaker as parts of the molding on the lower portion of the speaker were broken. The harness that comes from the head unit was just dangling. I searched for wiring diagrams for the harness but no luck, so I got out my trusty multi-meter, a small pc-speaker with stripped wires, and went to work. Here is the wiring diagram:
The brackets represent the slots that slid into the male harness end. The side with the outward piece is the piece I chose as the "top".
________[ ]________
(1) (2)
(3)
(4) (5)
(6)
(7) (8)
________[ ]________
1: White- Switch
2: Red-Blue lead to Right speaker
3: Brown-Red lead Right speaker
4: Red-Blue (thicker): 12v
5: Blue-Green Right pre-amp from head unit. I am assuming they are pre-amps as I got a voltage reading of about 1v with the volume full blast. It was just enough to just barely run the speakers or the pc-speaker at full blast as well.
6: Red-Green Left pre-amp from head unit
7: Brown (thicker) Ground
8: 2 Brown-black Grounds for pre-amp leads.
You should probably check this out on your harness if you are replacing your stock amp (and/or speakers) to make sure. You know the disclaimer routine.
As you can see, there are no left speaker leads. My understanding is the amp/speaker setup comes with the amp having a direct connection to the left speaker terminals.
First I cut off the harness, stripped wires, and loose-wired all the wires to my new amp before mounting. Once I was satisfied again that everything was what it appeared, I proceeded to mount the amp with four galvanized zip screws to the rear deck from below. I made sure to attach it to double walled areas with nothing above it so they wouldnt come through the deck. I also removed the rear deck cover to facilitate in running wires, but it really didnt help that much anyway. I mounted the amp close to the left speaker as I had already mounted a 6-CD changer to the rear deck near the right speaker. I was able to put the amp quite a ways back and out of the way. Because the amp was so cheap (but still well overmatched for the crap base speakers Audi put in) and light that I am sure the 4 zips would hold it there fine forever. If you are doing this with a real amp that is heavier, I might suggest actually bolting the amp to the rear deck. Then I proceeded to really wire. Since my amp had rca jacks in, I had to cut up an RCA cable, strip wire that to the pre-amp leads. All the pre-amps and leads I finger wired together, folded over, and wrapped with electricians tape, then wrapped again with a layer of gaffers tape. The power and the switch I used orange (small) wing-nuts and then wrapped with electricians tape. I did not use the #7 Ground/Common and grounded the amp directly to the rear deck. I dont think it matters to not use the harness ground, and perhaps I should have tested that... If anyone has a good reason you should, please let me know as I would be happy to know that if it helped anything out.
For amp-to-right speaker connection, I actually pulled into the wire run that came into the harness where it passed by the amp and ran it directly the amp rather than piggy-tail it from the harness point. For the left speaker, since I had the rear deck cover off, I measured my needed speaker wire length, cut it, then took out the speaker and soldered the wire length directly to the terminals. Then I reinstalled the speaker and ran the wire to the amp. This only required about an 10 inch length of speaker wire.
I tested everything, turned the gain almost all the way down on the amp (this seemed to match the front speakers best). Left it on flat (full range) for crossover (that seemed to be best as well), and left the bass-boost (loudness) on. I put everything back together and tested again. Great! The stock sound system in the A4 pretty much sucks, and this new amp pretty much didnt change a thing to that status I am sure (I have test driven other A4s with same sound system and they sound pretty much the same, sucky). But at least the rear speakers were working again. It made me really appreciate my "Sun & Sound" package Infiniti sound system in my 2003 Mitsubishi Eclipse! Wow, what a difference. But I would say that the A4 sounded about the same as my 2000 Honda Accord EX with the JBL speakers and stock head unit (again, nothing to rave about, but fine for just plain old drive along music/news).
One thing I noted: The right speaker was marked 4ohm. My amp was 8ohm or 4ohm bridged. Since my amp was cheap, but surely had much more wattage (even if we assume the real wattage of this 200w amp is only 40-60w/channel sustained that had to be more than the miniscule little amp that is installed on the stock system), hooking up small 4ohm speakers to an 8ohm amp meant that the speakers would draw more than it should, but so what. I think it will handle it.

Monday, August 19, 2013
Audi A3 Ultimate Pedals
The lurch/hesitation off the line was really due to poor clutch control. It made me look like I dont know how to drive, and I was afraid of slipping off the clutch while parking and hitting something or someone. I could drive the RX-8 with its wonderful clutch positioning and feel, and then get back in the A3 and thoroughly hate how it felt. I had to do something about it.
While other people were excitedly ordering the VW GLI pedals for their A3s, I decided to go for the form follows function approach, which is most appropriate for this car anyway. I ordered a set of custom-fitted Ultimate Pedals for the clutch and brake, in the frosted non-slip finish with domed rubber inserts.
When they arrived, the pedals themselves were great but I was appalled at the included screws. They stuck up rather than fitting flush into the conical holes in the pedals. That was OK, though, because I had a plan that required different screws anyway....
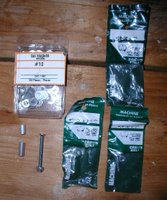
From Home Depot I got some No. 10 fine-thread machine screws, flat head (for recess mounting) in various lengths, and corresponding nylon locking nuts for them. I also got metal sleeve spacers with a compatible inside diameter for the screws, in 1/2 and 3/4 inch lengths, and a pack of No. 10 washers. These screws fit the Ultimate Pedal covers perfectly, both in the diamter of the screw shaft and in the way that the head fits perfectly flush into the cover. This is what they should have come with.... I wish I could have found black powder-coated screws that would have been almost invisible next to the black rubber inserts, but thats probably asking a bit too much.
I removed the original rubber covers from the clutch and brake. The clutch pedal is plastic, the brake pedal is metal (by this I mean the actual parts attached to the car, not the covers). After deciding where the screws would go, I put the rubber inserts into the rest of the holes in the pedal covers that would not be taken up by the screws. I marked and drilled the clutch and brake pedals, and attached the brake pedal cover using the screws, washers and nylock nuts. I went ahead and bolted it down tightly since I wasnt changing anything about the brake pedal height.
The clutch cover was the key to making it feel like I want. I used a 1/2" spacer on the bottom and centre screws, and 3/4" spacers on the top screws. That didnt fit right... the curvature of the pedal didnt cooperate with the spacer lengths, so I used some of the No. 10 washers to shim it out correctly - 5 washers under each 3/4" spacer, and 4 washers under each 1/2" spacer. The result is that the Ultimate Pedal cover is raised off of the actual clutch pedal a little over 1/2" at the bottom, and over 3/4" at the top. This plus the thickness of the Ultimate Pedal covers themselves gives me just under an inch of additional lift on the top of the pedal. Angling it like this is crucial, because when the pedal is pushed down the angle with respect to your foot changes. The thickness at the top of the pedal is more apparent and useful when it is depressed, and less noticable when it is up, due to the angle. I almost went for even more lift on the pedal, but this has really done it for me nicely.

Now, it feels right. You cant see that the clutch has been elevated unless you stick your head down there, but boy can you feel the improvement! When in a comfortable, legs-not-squished position, you can stomp the clutch all the way to the floor without hyperextending your ankle or twisting in the seat. Taking off from a dead stop is much faster and smoother since you have more control over the clutch, and maneuvering to park no longer makes me feel like a little kid driving who cant reach the pedals.
Someday Ill get a VW GLI accelerator (part number 1K1 721 503 N for Manual Transmission cars, or part number 1K1 723 503 N for DSG/S-Tronic cars) to match the aluminum look of the clutch and brake. For now, though, this may be the best mod Ive done so far.
Friday, August 16, 2013
How to replace Audi A4 brake pads and rotors
I couldnt find complete instructions on how to replace my brake pads and rotors, so I decided to go ahead and make my own.
These instructions are for replacing the stock front brakes and rotors for a 1999 Audi A4 (the old style, not the 99.5 body) with ATE Powerdisc slotted rotors and Mintex Red Box pads (without the sensor). Im assuming that you already know the proper procedure for jacking up your car, and for removing the wheels.
This took me about 2 hours for the first wheel, and 45 minutes for the second wheel (after I figured out what I was doing).
And of course a disclaimer: Do no attempt this if you are uncomfortable with servicing your vehicle, are not mechanically inclined, or are afraid of getting dirty. The following is only an illustrative guide and is not a complete set of instructions for brake servicing. I make no warranty on the accuracy of this information and am not liable for any damage, injury, or death that may occur as a result of using this information.
Getting StartedTools needed for replacing the brakes:
| |
 |
|
Remove the Spring Clip | |
 |
|
Remove the Brake Caliper | |
 |
|
Retract the Brake Piston | |
 |
|
Remove the Caliper Bracket & Rotor | |
 |
|
Installing the New Pads and Rotors | |
Update: After putting about 400 miles on them, the pads and rotors feel fine, although the pads certainly lack that "bite" that the stock pads have. Yes, brake dust is cut down, but personally I like the stock pad "bite" better. | |
Saturday, August 10, 2013
Audi A4 B5 N75 Valve Replacement
| N75 Valve Replacement | BSK | 2005 |

30mins install time/difficulty 3 because of tightness
The N75 is located in between the airbox and engine just above the turbo in the hose going towards the airbox.
make sure your engine is cold when replacing or some burns will accompany this replacement!
Disconnect the plastic air filter connector from the air box and the front intake. remove 2 phillips screws and pull out the piece.
Remove the crankcase breather filter (pancake filter or what ever its called) to have better access to the N75.
Disconnect the cable by squeezing the silver security lock
Now comes the fun part to remove those twist on clamps. I used a small end banding snip plier and pulled up on the clamp side that has the notches. the clamp basically lets loose and can be taken off.
Remove all 3 clamps and pull the N75 out.
Replace with the replacement and put everything back together as it was and secure with clamps. I dont think that zipties would hold up in a high heat environment so do that own your own risk. I have the hoses on there without any clips so far.
Thats it!
058 906 283 F is the N75F valve
058 906 283 C is the N75C valve
Part number stays the same only the last letter changes to the actual letter designation
I went out for a test drive in the rain and I am spiking now at 18psi and run 16psi of boost with the giac chip. however the best part is that the boost comes on rather quickly now than before. Im happy!
Saturday, August 3, 2013
How to replace Audi A4 brake pads and rotors
I couldnt find complete instructions on how to replace my brake pads and rotors, so I decided to go ahead and make my own.
These instructions are for replacing the stock front brakes and rotors for a 1999 Audi A4 (the old style, not the 99.5 body) with ATE Powerdisc slotted rotors and Mintex Red Box pads (without the sensor). Im assuming that you already know the proper procedure for jacking up your car, and for removing the wheels.
This took me about 2 hours for the first wheel, and 45 minutes for the second wheel (after I figured out what I was doing).
And of course a disclaimer: Do no attempt this if you are uncomfortable with servicing your vehicle, are not mechanically inclined, or are afraid of getting dirty. The following is only an illustrative guide and is not a complete set of instructions for brake servicing. I make no warranty on the accuracy of this information and am not liable for any damage, injury, or death that may occur as a result of using this information.
Getting StartedTools needed for replacing the brakes:
| |
|
|
Remove the Spring Clip | |
|
|
Remove the Brake Caliper | |
|
|
Retract the Brake Piston | |
|
|
Remove the Caliper Bracket & Rotor | |
|
|
Installing the New Pads and Rotors | |
Update: After putting about 400 miles on them, the pads and rotors feel fine, although the pads certainly lack that "bite" that the stock pads have. Yes, brake dust is cut down, but personally I like the stock pad "bite" better. | |
Friday, July 26, 2013
2011 Audi A6 Owners Manual brochures
DOwnload: 2011 Audi A6 Owners Manual brochures