Tuesday, February 27, 2018
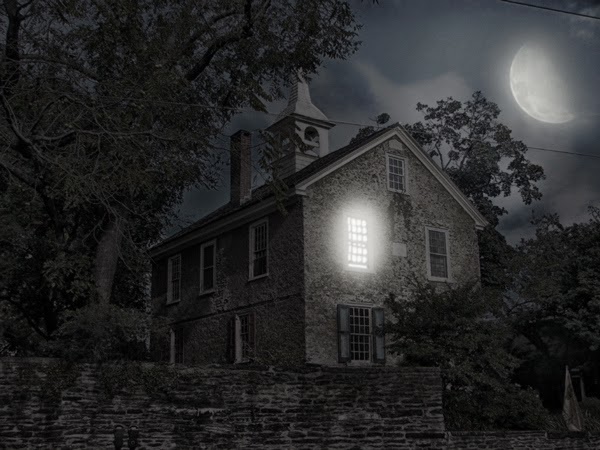
Convert Time of Day into Night with Photoshop
Convert Time of Day into Night with Photoshop

Tutorial Details
- Program: Adobe Photoshop CC, Photoshop CS6, Photoshop CS5
- Estimated Completion Time: 45 minutes
- Difficulty: Beginner
Resources
- School
- Moon
Step 1
Open image �House�.
Let�s darken the image a little bit with curves. Create a Curves Adjustment Layer (Layer > New Adjustment Layer > Curves) and adjust the sliders as shown below. Dragging the curve down darkens the image.
Step 2
Create a new layer (Ctrl + Shift + Alt + N) and fill it with black (press D for default colors and Alt + Backspace to fill the layer with the foreground color). Lower the opacity of this layer to 44%. This will make our image even darker.
Step 3
At night the colors are usually more desaturated compared to daylight. Let�s do this in our image by creating a Hue/Saturation Adjustment Layer by going to (Layer > New Adjustment Layer > Hue/Saturation). Drag the Saturation layer all the way to the left in order to decrease the saturation and after that lower the opacity of this layer to 46% in order to leave some colors in the image.
Step 4
Night photos usually have a bluish/cyan tint, or at least this is how we imagine it (being cold and all). Create a Color Balance Adjustment Layer by going to Layer > New Adjustment Layer > Color Balance. Add a little blue and a little cyan.
Step 5
Our night photo looks decent but we�re not done yet. Let�s create some light from one of the windows. First create a new layer and with a round brush of your choosing paint between the frames of the window with an almost white color (#dadada).
Now choose a round soft brush and paint some glow around the window using a slightly yellow color (#e9e8d4).
Step 6
Night is not night without the moon. Open the image �Moon�.
Choose Select > Color Range and click once anywhere on the black background. Press Ok in order to create a selection. Now press Ctrl + Shift + I to invert it.
New let�s copy our selection by pressing Ctrl + C. Go back to our night photo and press Ctrl + V to paste.
Press Ctrl + T to Transform the moon. Shift-drag on the corners in order to resize it proportionally and drag it from the center in order to place it in the upper-right corner of our image. Lower the Opacity of the moon layer to 72%.
Step 7
As it is the moon looks way to strong and dominant. Let�s tone it down a bit by adding a layer mask to it (Layer > Layer Mask > Reveal All). Now choose a round soft brush at 50% Opacity and paint with black over the moon to hide most of it. You should have something like in the image below.
Step 8
The moon usually looks yellow (unless you live on another planet and have a different moon) and it glows a bit. Let�s add those attributes to our moon. Double click the Moon Layer in order to enter Advanced Blending mode and add a Color Overlay and an Outer Glow. For the Color Overlay use #fff587 and for the Outer Glow use #ffffbe.
Step 9
Since the moon is a source of light (a weak one) we should see that reflected in our image. Let�s paint some highlights on areas that should receive light. Use a 1px round brush at 50% opacity and paint with white on the corners of the roof that face the moon, a little on the top of the trees and over the (telephone?) wire in the upper part of the image.
Step 10
Now let�s lighten some areas that are close to the sources of light. Create a Curves Adjustment layer and add a layer mask to it. Fill the mask with black in order to hide it and with a white brush at 30% Opacity paint around the lighted window and a little around the moon.
Step 11
We are almost done. At night the details are not so sharp as in daylight so let�s blur our image and also tweak the saturation a bit.
Create a new layer from all visible (Ctrl + Shift + Alt + E) and apply 0.7px Gaussian Blur to it (Filter > Blur > Gaussian Blur). Desaturate this layer by pressing Ctrl + Shift + U. Now simply lower the Opacity to your liking (60% works nice enough for me).